
Enhancing Server Security With Preemptive IP Banning.
If you have not given much thought about network security before, that will likely change as soon as you set up a server, especially one that is exposed to the internet.
You will likely find that within minutes of opening up the ports to the outside world, at least once you check your logs, such as /var/log/secure, you’ll find dozens, then hundreds, then thousands and beyond of brute-force attempts against your hapless server, particularly on your SSH and FTP services.
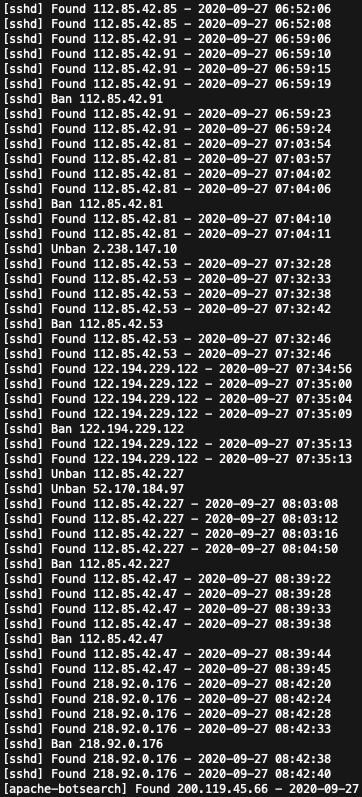
Hackers, or perhaps more appropriately, “crackers” across the world will be using certain tools, called scanners, that are capable of scanning all four billion+ IPV4 addresses in a matter of hours. Once your machine’s ports are discovered (and they will be discovered in short order), the floodgates will open and you’ll begin to see something like this in your logs:

As you can see, these “crackers” are absolutely relentless. Your server will be under attack day and night, literally every few seconds of every single day. Fortunately by taking some relatively simple steps and putting some standard security policies in place, you will at least enjoy some basic protection. Such things as reassigning ports to something other than the default port 22 for SSH, Port 21 for FTP and using vsftpd, and disabling remote root login will go a long way. Additionally, security enhancements such as using SSH key based authentication rather than passwords where possible and using very strong passwords when not will offer some protection.
Another tool which has likely become a standard security component for any modern server is Fail2Ban. Fail2Ban is an intrusion detection system that monitors server logs for malicious activity. Widely configurable, Fail2Ban will block activity that it identifies as malicious by configuring the firewall to ban any host IP address that makes too many login attempts or performs certain common, and predefined, unwanted actions.
Fail2ban is, in and of itself, a must have tool to aid in the defense of your system, adding a tangible layer of security to your network. From the moment you switch it on the first time, you will feel a real sense of relief as you see it banning those bad IPs by viewing and refreshing the /var/log/fail2ban.log. Additionally, Fail2Ban includes an almost hidden function that, from this author’s perspective, seems to be remarkably underutilized and under-documented.
AbuseIPDB
I would generally consider, at least arguably, that the basic security precautions that have been mentioned so far are “defensive” in nature. Shoring up our defenses by reassigning ports, disabling remote-root login, strong passwords, even Fail2Ban, are things we do in general, before we even put the server online and expose it to the internet – before we see what actual threats await us once we flip that switch.
What if, in addition to the security precautions discussed, we could respond proactively to actual threats that exist in the real world right now? Specifically, by preemptively banning known abusive IP addresses by the thousands, or even tens of thousands, that are attacking real servers at this very moment? Cutting those “crackers” off at the pass before they even get the first password prompt from our server? Having our system return a “port unreachable” error the very first time they attempt to access it, be it on port 80, 443, 21 or 22, or any port between 0-65535 – before even one single brute-force attempt?
This is possible and I’ve found it to be a remarkably effective layer of security. When I implemented this functionality on my server I was quite impressed, surprised even, at just how effective this layer of security is. It’s immediately obvious the moment you switch it on, and easily measurable over time.
AbuseIPDB (abuseipdb.com) is an online database of IP addresses which have been identified as having been associated with malicious activity, reported by webmasters, system administrators and other interested parties. Most commonly, these IP address are submitted automatically by Fail2Ban, when deliberately configured to communicate via AbuseIPDB’s API, and other detection systems installed on servers.
Typically, when an IP address has been positively identified by Fail2Ban as abusive, and a banning event is triggered, the IP address will then be submitted to AbuseIPDB along with the associated log entries and categorized based on the abusive behavior detected, such as “Port-Scan,” “SSH Brute-Force,” “SQL Injection,” “Bad Web Bot,” “Fraud Orders,” among others.
AbuseIPDB’s API is quite powerful; for example, e-commerce hosts can check and verify IP addresses associated with online orders against AbuseIPDB’s database. If the IP associated with the order has been reported for malicious behavior, the order can be flagged for a fraud review.
AbuseIPDB’s API runs both directions, allowing for the download of malicious IP addresses. Once acquired, these IP addresses can be loaded into an IP Set (or IP Table), and firewall rules can then be created to preemptively block access to the server from these abusive IPs.
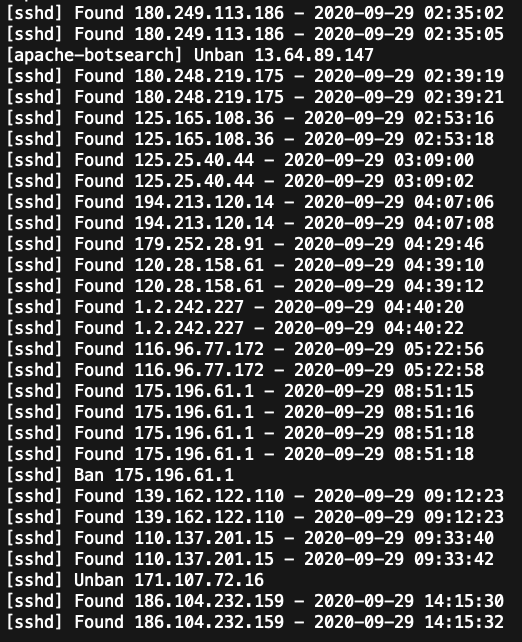
In my experience, once these firewall rules sourced from these IPs are created, the access logs will reveal a significant drop in abusive access, from every few seconds to sometimes 10, 20, even 30-minutes or more.
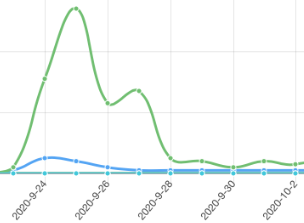
You will see a significant reduction in the number of IP’s your Fail2Ban configuration actually bans since the “crackers” behind these attacks no longer have access to the server in the first place – a good thing. If you set up Fail2Ban to report IPs to AbuseIPDB, this is most obvious by looking at the “APIv2” tab on the AbuseIPDB website, where you’ll see a chart of your report activity updated in real-time.
Although Fail2Ban can update the server’s firewall rules and ban IP addresses as it scans the server’s logs, while uploading those banned IPs to AbuseIPDB, it can not download those lists and update the server’s firewall for you. While you could do this manually (ideally at least every day) that would prove labor intensive and not at all practical.
Cron Scheduler
In this exercise, we will create a cron.daily bash script to automatically download a fresh plaintext list of malicious IPs, process that list, and generate firewall rules to ban those IP addresses. The full code for the script appears at the end of the post.
This will be done using the same firewallcmd-rich-rules icmp-port-block mechanism Fail2Ban uses out-of-the-box on Fedora and Fedora derived systems, such as Red Hat Enterprise Linux and CentOS – while sourcing the IPs from IP SETs. Firewalld uses the “rich language” syntax to create firewall rules in a language easier to understand than a direct-interface method. IP SETs are used in firewalld zones as sources and also as sources in “rich rules.” Other Linux distributions could be configured with firewalld, or you can adapt the script to work with your firewall’s configuration and iptables, if necessary.
You will need to create an account with AbuseIPDB in order to generate an API key. While there are paid accounts available that offer such features as “fresher/freshest” blacklist results and more daily bandwidth, I’ve found the free account provides enough capability.
I would recommend “giving back” and setting up your Fail2Ban installation to automatically log banned IPs with AbuseIPDB. It’s easy to do, and it’ll give you access to nice charts (bans per day) to visualize your security more easily than looking at logs files.
There is “Fail2Ban Integration” documentation on the website. While it is simple to configure, I did find some inconsistency in the documentation with regards to the correct “curl” format for use with the API. The command is configured in /etc/fail2ban/action.d/abuseipdb.conf – this is the curl command I use which works in my system as of this publication:
actionban = lgm=$(printf '%%.1000s\n...' "<matches>"); curl -sSf "https://api.abuseipdb.com/api/v2/report" -H "Accept: application/json" -H "Key: <abuseipdb_apikey>" --data-urlencode "comment=$lgm" --data-urlencode "ip=<ip>" --data “categories=<abuseipdb_category>"In the script I added comments for each command describing it’s function, but further details will be provided here in for each group of commands:

Copy the bannedips.sh script into your /etc/cron.daily directory, and give it root permissions and make it executable.

The permanent and persistent ip sets must be manually created first. This only needs to be performed once. During the daily cron execution of this script, the IP address will be unloaded and reloaded into these same ip sets, which will then be used as sources for the firewall rules later on. Don’t forget to systemctl restart fail2ban to reload it’s current rich-rules (banned IPs).

The daily-downloaded plaintext blacklist will be downloaded to this directory. We will also perform some minor processing of this file, blacklist.txt, later in the script using sed commands.

Replace my_abuseipdb_api_key with the API key you generated from AbuseIPDB using the “APIv2” tab > generate key. Do not use spaces around the equals sign or quotation marks.
This will generate a log indicating the date and time the script was executed, along with four “success” results (hopefully) indicating the rich rules were removed and replaced.

While removing the firewallcmd-rich-rules entirely may not be necessary, it’s being done here to ensure that the rules are loaded into firewalld’s “runtime” environment at every execution. To stay consistent with Fail2Ban’s rich-rule configuration, we are not loading the rules using the —permanent option. (updated script at the end now adds additional –runtime-to-permanent commands).

Using the –remove-entries-from-file command would seem to be the simplest method of clearing yesterday’s banned IPs from the ip sets. At this time the same blacklist plain-text files that were used to load the ip sets are now used to clear them.
The commands are being run twice in order to unload the old IPs from the permanent and runtime environments. Firewall-cmd does include the option –runtime-to-permanent to save active runtime configuration and overwrite permanent configuration with it, though I decided not to use it.
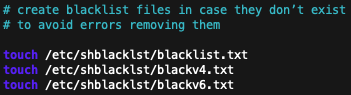
Simply to ensure clean execution of the script in case these files don’t yet exist, this will generate them.
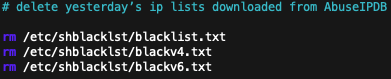
This will delete the old blacklist plain-text files from yesterday, as they are no longer needed.

The plain-text blacklist file of today’s most recently reported malicious IPs is downloaded. The confidence and limit options are configurable. AbuseIPDB recommends a minimum abuse confidence level of 90%. Generally, widely reported IPs from multiple unique sources receive a higher confidence rating of truly being malicious. Setting this option too low may result in non-abusive IPs being banned from your server. Since there is a limit on the number of IP addresses downloaded, this theoretically could result in fewer truly malicious IPs included in the list.
Free registered accounts on AbuseIPDB can download up to a maximum of 10,000 IP addresses per download (up to five times a day). I have found the 3000-4000 range to provide good results. Downloading more than 4000 may result in diminishing returns on effectiveness. This configuration was designed to run on an old Pentium-D server, so processing load is taken into consideration. The 3.4 GHz Dual-Core NetBurst Pentium-D takes about 90 seconds to load these 4000 IPs addresses into the firewall.

Firewalld IP Sets can be configured for IPV4 or IPV6 (inet6) addresses, but not both simultaneously. The plain-text blacklist file of malicious IP addresses will contain both IPV4 and a few IPV6 addresses. Using the sed command twice, two lists may be generated from the one file, each list, blackv4.txt and blackv6.txt, will include just IPV4 and IPV6 addresses, respectively.
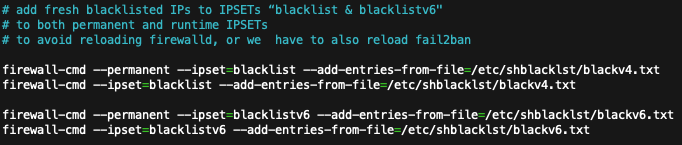
The plain-text IP addresses will now be loaded into the proper IP Sets. This is done twice per IP Set, in the script, to ensure the current runtime environment is updated, and in case of a restart, the IP addresses will remain persistently loaded in the IP Sets. In case of a restart the following “rich rules” will need to be reloaded, however (in keeping with Fail2Ban’s mechanism).

Finally, the rich rules which will return an “ICMP PORT UNREACHABLE” to banned IP address are created, in the same manner as Fail2Ban’s banning mechanism. Of course, there are different options for performing the block, but this was chosen to keep consistent with Fail2Ban’s method of blocking. The final two “success” entries in the log of events are created as well.
If you want these rich rules to remain persistent through restarts of firewalld or reboots, you’ll need to add a second set of –add-rich-rule commands that include the –permanent option – or run a “firewall-cmd –runtime-to-permanent” command once at the end of the script. Don’t forget to add a second set of commands including the –permanent option when removing the rich rules earlier in the script.
The code for the script has been posted below so you may copy and paste it into your editor. While there certainly may be different ways to accomplish the same task, this method has been working perfectly. Preemptively banning IPs should be considered as part of a multilayered approach in protecting a network.
update 10/6/20: The script below is an enhanced version that increases the number of banned IPs from 4000 to 9999. Since it now takes my Pentium D server 10 minutes to load the firewall rich rules, I also block SSH service in the beginning and restart it at the end while the server is vulnerable. “Sleep 60” command was added prior to unblocking SSH to allow firewalld to finish processing.
The firewall rich rules are now loaded and unloaded in both runtime and permanent environments.
Discuss this article in our forums.
#!/bin/sh
# 2020 Decision Concepts Technology Innovators, decisionconcepts.com
# Developed and tested using Red Hat Enterprise Linux 8
# bannedips.sh, protect a server by proactively banning abusive IP addresses
# uses firewallcmd-rich-rules, the same mechanism as fail2ban
# IPs are cleared and fresh IPs loaded every 24h
# Shane Hill
# v1.2, supports both IPV4 & IPV6 address banning
# install this script in /etc/cron.daily
# chown root:root /etc/cron.daily/bannedips.sh
# chmod +x /etc/cron.daily/bannedips.sh
# permanent IPSETs “blacklist” & “blacklistv6” must be created:
# firewall-cmd --permanent --new-ipset=blacklist --type=hash:net
# firewall-cmd --permanent --new-ipset=blacklistv6 --type=hash:net --option=family=inet6
# firewall-cmd --reload (fail2ban must be restarted when '--reload' executed)
# create DIR for AbuseIPDB blacklist file storage
# mkdir /etc/shblacklst
# Enter ABUSEIPDB API key here, no spaces
abuseipdb_apikey=my_abuseipdb_api_key
# create a log of events
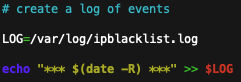
LOG=/var/log/ipblacklist.log
echo "*** $(date -R) ***" >> $LOG
# Block SSH service while server is vulnerable during script execution
firewall-cmd --remove-service=ssh
# remove yesterday’s IPSET rich rules because we are going to create a new ones
firewall-cmd --zone=public --remove-rich-rule='rule family=ipv4 port port="0-65535" protocol="tcp" source ipset=blacklist reject type=icmp-port-unreachable' >> $LOG
firewall-cmd --zone=public --remove-rich-rule='rule family=ipv6 port port="0-65535" protocol="tcp" source ipset=blacklistv6 reject type=icmp6-port-unreachable' >> $LOG
firewall-cmd --permanent --zone=public --remove-rich-rule='rule family=ipv4 port port="0-65535" protocol="tcp" source ipset=blacklist reject type=icmp-port-unreachable' >> $LOG
firewall-cmd --permanent --zone=public --remove-rich-rule='rule family=ipv6 port port="0-65535" protocol="tcp" source ipset=blacklistv6 reject type=icmp6-port-unreachable' >> $LOG
# Clear yesterday’s IPs from IPSETs “blacklist” & "blacklistv6"
# IPSETS themselves are persistent
firewall-cmd --permanent --ipset=blacklist --remove-entries-from-file=/etc/shblacklst/blackv4.txt
firewall-cmd --ipset=blacklist --remove-entries-from-file=/etc/shblacklst/blackv4.txt
firewall-cmd --permanent --ipset=blacklistv6 --remove-entries-from-file=/etc/shblacklst/blackv6.txt
firewall-cmd --ipset=blacklistv6 --remove-entries-from-file=/etc/shblacklst/blackv6.txt
# create blacklist files in case they don’t exist
# to avoid errors removing them
touch /etc/shblacklst/blacklist.txt
touch /etc/shblacklst/blackv4.txt
touch /etc/shblacklst/blackv6.txt
# delete yesterday’s ip lists downloaded from AbuseIPDB
rm /etc/shblacklst/blacklist.txt
rm /etc/shblacklst/blackv4.txt
rm /etc/shblacklst/blackv6.txt
# download new blacklist plaintext list of bad IPs from AbuseIPDB
# Abuse confidence = 90%+, 9999 total IPs
curl -G https://api.abuseipdb.com/api/v2/blacklist -d confidenceMinimum=90 -d plaintext -d limit=9999 -H "Key: $abuseipdb_apikey" -H "Accept: application/json" > /etc/shblacklst/blacklist.txt
# Strip IPV6 addresses from list and create blackv4.txt
# Strip IPV4 addresses from list and create blackv6.txt
sed '/:/d' /etc/shblacklst/blacklist.txt > /etc/shblacklst/blackv4.txt
sed '/\./d' /etc/shblacklst/blacklist.txt > /etc/shblacklst/blackv6.txt
# add fresh blacklisted IPs to IPSETs “blacklist & blacklistv6"
# to both permanent and runtime IPSETs
firewall-cmd --permanent --ipset=blacklist --add-entries-from-file=/etc/shblacklst/blackv4.txt
firewall-cmd --ipset=blacklist --add-entries-from-file=/etc/shblacklst/blackv4.txt
firewall-cmd --permanent --ipset=blacklistv6 --add-entries-from-file=/etc/shblacklst/blackv6.txt
firewall-cmd --ipset=blacklistv6 --add-entries-from-file=/etc/shblacklst/blackv6.txt
# create new firewalld rich rules to reject today’s blacklisted V4 & V6 IPs
firewall-cmd --zone=public --add-rich-rule='rule family=ipv4 port port="0-65535" protocol="tcp" source ipset=blacklist reject type=icmp-port-unreachable' >> $LOG
firewall-cmd --zone=public --add-rich-rule='rule family=ipv6 port port="0-65535" protocol="tcp" source ipset=blacklistv6 reject type=icmp6-port-unreachable' >> $LOG
firewall-cmd --permanent --zone=public --add-rich-rule='rule family=ipv4 port port="0-65535" protocol="tcp" source ipset=blacklist reject type=icmp-port-unreachable' >> $LOG
firewall-cmd --permanent --zone=public --add-rich-rule='rule family=ipv6 port port="0-65535" protocol="tcp" source ipset=blacklistv6 reject type=icmp6-port-unreachable' >> $LOG
# Pause script execution for 1M to allow firewalld to settle
sleep 60
# Restart SSH service
firewall-cmd --add-service=ssh
# ENDDiscuss this article in our forums.